Convert Image to 300 DPI
Set a JPG or PNG to 300 DPI for a print shop, magazine, ID portal, or Etsy printable — including AI-generated images from ChatGPT, Midjourney or DALL-E that default to 72 DPI. Only the density tag changes — pixels are not resampled, quality is unchanged, and the file never leaves your browser.
How to convert an image to 300 DPI in the browser
Drop a JPG or PNG into the tool above. The current density tag is shown on each row. The target is already set to 300 — the value print shops, magazine art desks, ID-photo portals, and Etsy printables almost always ask for. Click Download. The file that lands in your downloads folder has rewritten JFIF/EXIF (JPEG) or pHYs (PNG) density, and the same pixel bytes it started with.
That last part is the whole product. Converting an image to 300 DPI on this site does not resample, does not recompress, and does not upload. A 4.2 MB camera JPEG is still a 4.2 MB camera JPEG. Tools that “convert DPI” by opening the picture and saving it again quietly degrade JPEG quality; there is no reason to pay that cost for a metadata edit.
If 300 is not the number on the brief, use a preset or the custom box. The homepage Image DPI Changer is the same engine with the same default; this page exists so the search phrase “convert image to 300 dpi” lands on copy that talks about that specific job.
Why 300 DPI became the industry habit
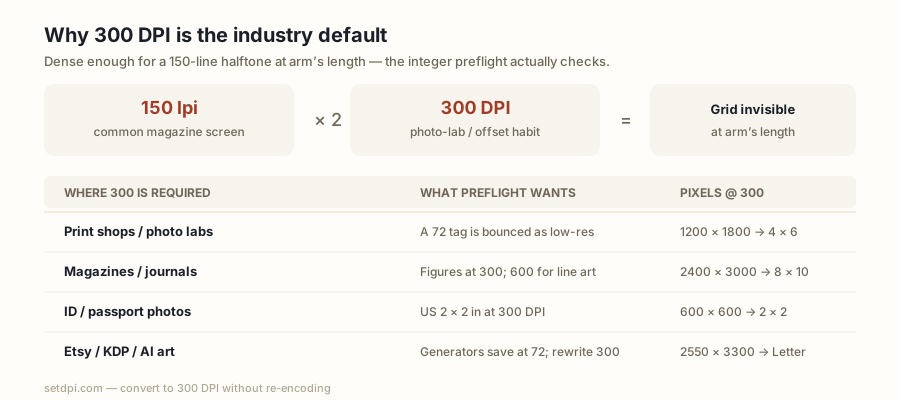
Offset printing and photo labs settled on roughly 300 pixels per inch because it is dense enough for a 150-line halftone (a common magazine screen) and for dye-sub or inkjet photo paper viewed at arm’s length. Below that, a careful eye starts to see the grid on a small print. Above that, the file grows and the press cannot put more detail on the paper than the screen ruling allows. 300 is a convention, not a law of physics — but it is the convention that preflight software, author guidelines, and marketplace checklists encoded.
So when a print shop says “files must be 300 DPI”, they usually mean two things at once, and they only check one of them automatically:
- The density tag in the file should read 300 (or the RIP should be told 300). This is what preflight reads in a second.
- The pixel count should support the ordered print size at that density: inches = pixels ÷ 300. A 1200 × 1800 px file is a legitimate 4 × 6 in print at 300 DPI. The same file is not a legitimate 16 × 24 in print at 300 DPI, tag or no tag.
This tool fixes the first requirement losslessly. It cannot invent the second. If the checker-style readout under each file shows a tiny print size at 300 DPI, the honest next step is a larger original or a specialist upscaler — not another pass through a DPI writer. SetDPI does not upscale.
Changing the 300 DPI tag vs resampling the pixels
Those two operations are constantly sold as the same thing. They are not.
Metadata rewrite (this tool): the JPEG or PNG keeps every pixel sample. Only the density instruction changes. File size stays essentially identical. Quality is identical because the decoder never runs. Print size shrinks as DPI goes up, because the same pixels are asked to sit closer together.
Resampling (Photoshop Image Size with Resample on, most “enhance” websites): the software creates a new pixel grid. Going from 72 to 300 “the resample way” on a 72 DPI 4 × 6 in image tries to manufacture about 4× the pixels on each side. That is a new picture. It can look acceptable or it can look smeared; either way it is lossy, and for JPEG it is a second generation of compression on top.
Use the rewrite when the pixels already cover the print. Use a resample or an AI enlarger only when they do not. A quick test: divide width in pixels by 300. If the inches you get are at least the inches you will print, rewrite the tag and stop. If they are not, no DPI converter will save the job.
| Pixel size | Print @ 72 DPI | Print @ 300 DPI | Typical fit at 300 |
|---|---|---|---|
| 600 × 600 | 8.3 × 8.3 in | 2.0 × 2.0 in | US passport photo |
| 1200 × 1800 | 16.7 × 25.0 in | 4.0 × 6.0 in | Standard lab print |
| 1500 × 2100 | 20.8 × 29.2 in | 5.0 × 7.0 in | Portrait print |
| 2400 × 3000 | 33.3 × 41.7 in | 8.0 × 10.0 in | Framed photo |
| 2550 × 3300 | 35.4 × 45.8 in | 8.5 × 11.0 in | US Letter / KDP page |
| 2480 × 3508 | 34.4 × 48.7 in | A4 | Printable / poster |
Formula again, because it is the only formula that matters: print inches = pixels ÷ DPI, and the centimetre column is inches × 2.54. The tool above computes it live for whatever target you have selected.
Where a 300 DPI file is actually required
Print shops and photo labs. Counter software and online order forms run preflight before a human sees the job. A 3000 × 2400 px photo tagged 72 DPI claims a 41-inch print. Against an 8 × 10 order, the system calls the file low-resolution and bounces it. The same pixels tagged 300 DPI claim exactly 10 × 8. That is the rejection this page is built for.
Magazine and journal submission. Author guidelines say “figures at 300 DPI, 600 for line art” because the typesetter, months later, has only the metadata to know how large a figure can sit. Portals increasingly enforce the number automatically. Convert the figure to 300 DPI here, keep the pixels, and re-upload. For charts with thin rules, 600 is the safer tag — use the 600 preset, or the increase page if you want the honesty lecture first.
ID and passport photos. A US 2 × 2 in passport image at 300 DPI is 600 × 600 px. Many government uploaders check the tag as well as the pixel box. A phone crop that is already 600 px square but tagged 72 will fail a strict checker; rewriting 300 is the correct fix. This tool will not crop or change colour space. If the portal also wants a specific millimetre size or a plain background, do that first, then convert.
Etsy printables, KDP interiors, print-on-demand. Buyers and platform QA treat 300 DPI as a promise that an A4 or Letter sheet will look crisp. A listing tagged 96 DPI collects “blurry when printed” reviews because home printers obey the tag and stretch the art. Setting 300 DPI does not add detail that was never in the file, but it stops the printer from treating an 8.5-inch design as a 35-inch banner.
AI-generated images (ChatGPT, Midjourney, DALL-E, Stable Diffusion, Gemini). Every major AI image generator saves files at 72 DPI. The pixel count is usually generous — ChatGPT outputs 1024×1024 or larger, Midjourney goes up to 2048×2048 — but the density tag tells printers to stretch those pixels across 14+ inches, well past what 300 DPI preflight will accept. Drop the AI-generated image here: the tag changes to 300, the AI's original pixels stay byte-identical, and the file is ready for KDP, Etsy, or your local print shop.
If you are not sure what the file currently claims, check it on the DPI Checker first. If you need the vocabulary for a client who said PPI, read DPI vs PPI. The lossless changer itself also lives on the homepage.