Increase Image DPI — Without Pretending It Adds Detail
Raise a JPG or PNG to 150, 300, or 600 DPI so a form stops rejecting it. The rewrite is lossless and local. It does not add pixels or enlarge the picture.
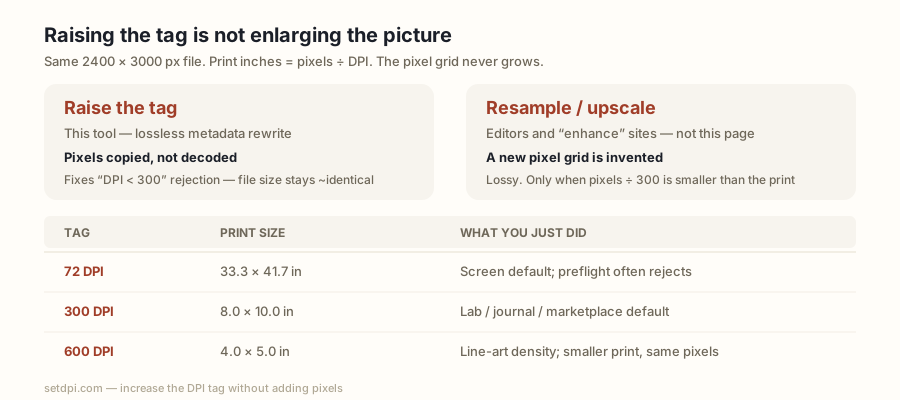
Increasing DPI only changes the density tag. Pixel dimensions stay the same, so print size shrinks as DPI goes up. This does not sharpen or enlarge the picture. It does fix “file rejected because DPI < 300”.
Increasing image DPI does not add pixels
This is the sentence most “increase DPI” tools bury. Raising the DPI tag does not create new pixels, does not sharpen edges, and does not make a small file safe to print large. A 800 × 600 px screenshot tagged 72 DPI and the same screenshot tagged 300 DPI contain the identical grid. At 300 DPI that grid is a 2.7 × 2.0 in print. At 72 DPI it is an 11.1 × 8.3 in print that looks soft because each pixel covers more paper.
If you need a bigger print that still looks sharp, you need more pixels — a larger original, a resample, or an AI enlarger. SetDPI does none of those things, on purpose. This page will not pretend otherwise.
So when is increasing DPI the right move? When the label is what failed, not the pixel count. That is a common, boring, expensive-if-you-get-it-wrong situation, and it is the one this tool is for.
When raising the tag is exactly the fix
Print-shop preflight, journal portals, KDP, and a long tail of “upload your artwork” forms often apply one rule: if DPI < 300, reject. They do not always compute pixels ÷ ordered inches. They read a field. A 6000 × 4000 px camera file tagged 72 — a 20 × 13 in print at 300 DPI, more than enough for a magazine page — still fails that rule. Increasing the DPI metadata to 300 is the entire solution. The picture does not change. The form stops arguing.
The same pattern shows up after a “Save for Web” export, after a WhatsApp or Messenger hop that stripped EXIF, and after a screenshot that never had a density field. The file is not low-resolution in any photographic sense. It is unlabelled or labelled with a screen default. Increase the tag; do not run it through a second JPEG encode.
Use the presets above for the three numbers people actually raise to:
- 150 — large-format posters and banners viewed from a distance. Preflight that demands 300 will still fail; only use 150 when the vendor asked for it.
- 300 — the default on this page. Photos, documents, KDP, Etsy printables, most labs.
- 600 — line art, logos, and charts in journal guidelines. It makes the claimed print size even smaller. Only help if the pixels support that size, or if the portal only checks the integer.
Type any other value in the custom box if a vendor wrote a peculiar number (254, 350, 400). The rewrite is the same.
How to increase image DPI losslessly
Drop a JPG or PNG. Pick 150, 300, or 600 — or type a number. Download. On JPEG, the tool writes JFIF density and EXIF XResolution / YResolution / ResolutionUnit. On PNG it writes or updates the pHYs chunk and repairs the CRC32. Pixels are copied, not decoded. Files never leave the browser.
The row shows current DPI → target DPI and the print size at the target. Watch that print size. If increasing 72 → 300 turns an “11 × 8 in” readout into “2.6 × 2.0 in”, you have correctly understood the trade: the tag went up, the claimed paper size went down. That is what you want when a form demanded 300 on a file that will be printed small. That is not what you want if you were hoping the picture would become a poster.
Batch works up to 50 files. “Download all” staggers the saves so the browser does not swallow them. Names get a _300dpi (or whatever you chose) suffix so the original stays on disk.
What this will not do — and what to do instead
It will not make a 640 px-wide web image look like a magazine cover. At 300 DPI that file is about two inches wide. Increasing DPI further makes it smaller on paper, not larger. To print that art at 8 inches, you need roughly 2400 px of width. Get a larger original from the photographer or designer. If one does not exist, you need a dedicated upscaler; this site will not grow the pixel grid.
It will not change colour, crop, or convert WebP/HEIC/TIFF. Export to JPEG or PNG first, then increase the tag. The export step is someone else’s quality decision; we only touch density after that.
It will not raise “effective DPI” on a press. Effective DPI is pixels ÷ physical inches of the finished piece. If the designer already placed your 1200 px logo across 8 inches of a layout, the effective resolution is 150 DPI no matter what the file tag says. Increase the tag in the logo file if the preflight wants to see 300, but also tell the layout to print the logo smaller or replace it with a larger asset. The tag cannot overrule how wide the box is on the page.
If you only needed to inspect the current value, use the DPI Checker. If 300 is the only number you care about, Convert Image to 300 DPI is the same engine with that story. The general changer is on the homepage. For why people say PPI on the same forms, see DPI vs PPI.
A short table of what “increase” does to print size
Same 2400 × 3000 px file, tag raised, pixels frozen:
| Tag | Print size | What you just did |
|---|---|---|
| 72 DPI | 33.3 × 41.7 in | Screen default; preflight often rejects |
| 150 DPI | 16.0 × 20.0 in | Fine for a poster viewed from a few feet |
| 300 DPI | 8.0 × 10.0 in | Lab / journal / marketplace default |
| 600 DPI | 4.0 × 5.0 in | Line-art density; smaller print, same pixels |
Read the table left to right as a warning label. Increasing image DPI is a relabelling. Used on a file that already has enough pixels for the physical size, it is the cheapest, safest fix in print production. Used as a substitute for resolution, it is a no-op dressed up as an enhancement.