DPI Checker — See an Image’s Print Density Instantly
Drop a JPG or PNG to check image DPI (and PPI), pixel dimensions, and print size. This page only reads metadata — it never rewrites your file — the image is read locally in your browser and is never uploaded.
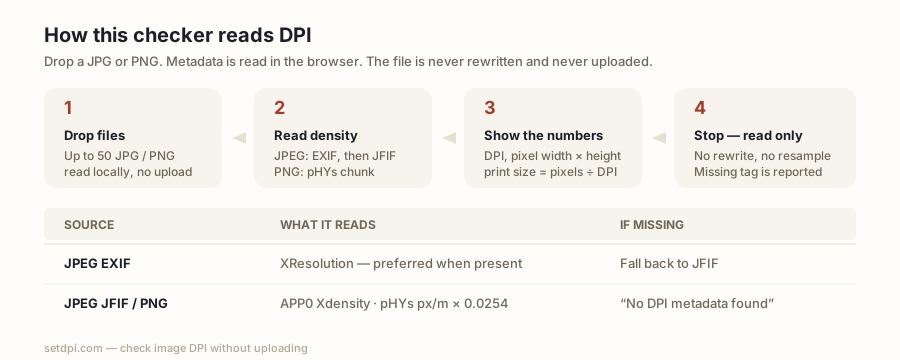
How to check the DPI of an image online
Drop a JPG or PNG onto the DPI Checker above, or click the box to browse. The file is read in your browser. In one pass you see the stored DPI (or PPI) value, the pixel width and height, and the print size those pixels produce at that density. Nothing is uploaded, and the file is not rewritten — this page is a reader.
Checking DPI is the step most people skip. A print shop, journal portal, or Etsy listing form then rejects the file for “low resolution,” and the photographer opens an editor looking for a resample slider. Nine times out of ten the pixels were already enough; the density tag was missing or set to 72. A checker tells you which of those two problems you actually have, before you change anything.
You can also check DPI on Windows (right-click → Properties → Details → Horizontal resolution) and on a Mac (Preview → Tools → Adjust Size). Those dialogs read the same fields this page reads. The browser version is faster when you have a handful of files, and it works on a Chromebook, a phone, or any machine that does not ship Preview.
Batch is supported: drop up to 50 files. Each row is independent. The checker never mixes one file’s tag with another’s.
What the number actually means
DPI — dots per inch — is a metadata instruction, not a measure of how sharp the picture looks on your screen. Screens ignore it. They paint image pixels to device pixels and stop there. The number only starts to matter when something that prints, or software that preflights a print job, reads the file.
Three values show up constantly. 72 DPI is the old Macintosh screen convention. A lot of web exporters, screenshots, and “Save for Web” pipelines still write 72, or write nothing and let the viewer assume 72. 96 DPI is the old Windows screen convention — the same idea, a default for software that felt it had to put some number in the box. 300 DPI is the print-industry habit for photos, magazines, journals, and most photo-lab work. At 300 DPI, each inch of paper gets 300 pixels, which is dense enough that halftone screening and normal viewing distance hide the pixel grid.
150 DPI is the usual compromise for large posters viewed from a few feet away. 600 DPI shows up in author guidelines for line art and hairline charts, where a soft photo-style 300 is not enough to keep edges crisp.
The relationship is a division, not a quality slider:
print size (inches) = pixels ÷ DPI
| DPI | Typical use | 3000 × 2000 px prints at |
|---|---|---|
| 72 | Screen default, web export | 41.7 × 27.8 in |
| 96 | Windows screen default | 31.3 × 20.8 in |
| 150 | Large-format posters | 20 × 13.3 in |
| 300 | Photo labs, journals, magazines | 10 × 6.7 in |
| 600 | Line art, hairline charts | 5 × 3.3 in |
A 3000 × 2000 px photo is 10 × 6.7 in at 300 DPI, and 41.7 × 27.8 in at 72 DPI. Same pixels. The 72 DPI version is not “lower quality” as a digital file; it is labelled as a poster, and a preflight tool that expected a 10 × 8 print will call it low-resolution because 41 inches of claimed width does not fit the order. Flip the tag to 300 and the same bytes claim 10 × 6.7 in.
If this checker reports 72 on a camera JPEG that is 6000 px wide, you do not have a 72 DPI camera. You have a 6000 px image whose exporter wrote a screen default. The print size at 300 DPI is 20 in wide — plenty for a poster — once the tag matches the job.
Why so many images have no DPI at all
If the checker says “No DPI metadata found”, that is not a bug in the tool. Most screenshots, most images saved from a browser, most files that passed through a social network, and many phone-share exports simply never write a density field.
JPEG can store density in two places: the JFIF APP0 segment (the older, simpler header) and the EXIF XResolution / YResolution tags, with ResolutionUnit saying whether the numbers are inches or centimetres. PNG stores it in the pHYs chunk as pixels-per-metre, which this checker converts back to DPI. If none of those structures exist, or the PNG pHYs unit is 0 (“unknown”), there is no honest DPI to display.
Viewers then guess. Photoshop, Preview, Windows Explorer, and most browsers assume 72 or 96 DPI when the field is absent. That guess is a display convenience, not data from your file. Reporting a fake 72 here would make the checker look more helpful and be wrong. The message on the row is deliberate: the file has no density metadata; viewers will assume 72 or 96.
That is also why a screenshot of a 4K desktop is a poor print file even after you later “set 300 DPI”. The screenshot is maybe 3840 × 2160 px with no density tag. At 300 DPI it prints about 12.8 × 7.2 in. The tag can be written — use the changer on the homepage — but the pixel count does not grow.
Camera originals usually do have EXIF resolution, often 72, 240, or 300 depending on the maker. Scanned files sometimes write the optical DPI of the scan, which is the one case where the number describes how the pixels were captured, not just how they should be printed. This checker only reads JPEG and PNG; TIFF is not supported.
After you check — change the tag without resampling
If the number is wrong for the job (72 when the portal wants 300, empty when the print shop’s preflight demands a tag), the fix is to rewrite the density fields and leave the pixels alone. That is what the homepage Image DPI Changer does: JFIF and EXIF for JPEG, pHYs plus a CRC32 for PNG. No re-encoding, no quality loss, no upload.
Do not “increase DPI” in an editor with Resample ticked unless you actually want more pixels. Resampling invents new samples and changes the file. It is the right move only when the print size you need is larger than pixels ÷ 300. Example: 1200 × 1800 px at 300 DPI is a 4 × 6 in print. If you need 8 × 12 in at 300 DPI, you need 2400 × 3600 px. Changing the tag to 300 does not manufacture those pixels. This site does not upscale.
Use the checker first. If the tag is the problem, set a new DPI on the homepage. If you specifically need the print-shop default, use Convert Image to 300 DPI. If a form rejected a 72 tag, Increase Image DPI walks through what raising the number does and does not do. For the vocabulary, see DPI vs PPI.
How this DPI Checker reads JPEG and PNG
For JPEG, EXIF is preferred when XResolution is present, because that is what Windows Properties and many RIPs display. The value is a rational (numerator / denominator). If ResolutionUnit is centimetres, the checker multiplies by 2.54 to report DPI. If there is no usable EXIF density, it falls back to JFIF: units = 1 means dots per inch, units = 2 means dots per centimetre.
For PNG, pHYs stores pixels per metre on X and Y. When the unit byte is 1 (metre), DPI ≈ pixels-per-metre × 0.0254. When the unit byte is 0, the chunk is a relative aspect ratio, not a print density, so this checker treats it as “not set”.
WebP, HEIC, TIFF, and PDF are out of scope. Convert those to JPEG or PNG first if you only need a density read; that conversion step is not lossless, and it is not done here.
A phone marketed as “400 PPI” is describing the screen hardware: about 400 hardware pixels in each inch of glass. That has nothing to do with the PPI or DPI tag inside a photo you open on that phone. The photo can be 72, 300, or untagged; the screen still maps image pixels to device pixels according to the browser or the photo app. So “check image DPI” is not “check how sharp this will look on my phone”. It is “check what print density the file claims, if it claims one at all”. For the screen you already have the only number that matters: the pixel width and height, which this checker also shows.